译:逆向工程 Cursor 的 LLM 客户端
原文: https://www.tensorzero.com/blog/reverse-engineering-cursors-llm-client/
作者: Viraj Mehta, Aaron Hill, Gabriel Bianconi
译者: Gemini 2.5 Pro
What happens under the hood at Cursor?
Cursor 的底层究竟发生了什么?
We wired TensorZero between Cursor and the LLMs to see every token fly by… and bend those API calls to our own will.
我们把 TensorZero 架设在 Cursor 和 LLM 之间,观察每一个飞驰而过的 token……然后随心所欲地改变那些 API 调用。
TensorZero is an open-source framework that helps engineers optimize LLM applications with downstream feedback signals (e.g. production metrics, human feedback, user behavior), and we figured it would be interesting to see whether we could use TensorZero on the LLM application we use most heavily ourselves: Cursor.
TensorZero 是一个开源框架,旨在帮助工程师利用下游的反馈信号(例如生产指标、人类反馈、用户行为)来优化 LLM 应用。我们想,既然我们自己最常用的 LLM 应用就是 Cursor,那么用 TensorZero 来研究它,应该会很有趣。
With our gateway between Cursor and the LLM providers, we can observe the LLM calls being made, run evaluations on individual inferences, use inference-time optimizations, and even experiment with and optimize the prompts and models that Cursor uses.
通过在 Cursor 和 LLM 提供商之间建立我们的网关,我们得以观察它发出的 LLM 调用,对单次推理进行评估,使用推理时优化,甚至可以实验和优化 Cursor 正在使用的提示词和模型。
Cursor is optimized for its population of users as a whole — beyond .cursorrules, is there room for improvement by diving deeper and tailoring it to individual users?
Cursor 是为它的全体用户进行优化的——但在 .cursorrules 之外,是否还有可能通过深入挖掘、为单个用户量身定制来获得改进空间呢?
What would it look like to be able to empirically experiment with and optimize Cursor for your individual usage patterns?
如果能够根据你个人的使用模式,通过实验来凭经验优化 Cursor,那会是什么样子?
Beyond optimization, Cursor still operates as a black box.
Wouldn’t it be interesting to see what’s actually being sent to the models?
除了优化,Cursor 本身仍然像一个黑箱。能亲眼看看它到底给模型发送了些什么,难道不是件有意思的事吗?
Nearly all LLM optimization, evaluation, and experimentation techniques require data on what inferences were made and their real-world consequences.
In this post, we’ll focus on the former and dive into how we set up TensorZero as a self-hosted proxy between Cursor and the LLMs that it calls.
If you’d like to try it yourself, check out the example in our repository.
We’ll follow up with a blog post on how we collect feedback and close the optimization loop.
几乎所有的 LLM 优化、评估和实验技术都需要数据,既要关于进行了哪些推理,也要关于这些推理在现实世界中的结果。在这篇文章里,我们将专注于前者,深入探讨我们如何将 TensorZero 设置为一个自托管的代理,架在 Cursor 和它调用的 LLM 之间。如果你想自己试试,可以查看我们代码仓库中的示例。我们之后还会发一篇博客,介绍我们如何收集反馈并闭合优化循环。
把它们连接起来
The first thing we noticed was that Cursor lets you override the OpenAI base URL and model names.
Perfect.
TensorZero exposes an OpenAI-compatible inference endpoint, so we can easily configure Cursor to call TensorZero instead of OpenAI.
我们注意到的第一件事是,Cursor 允许你覆盖 OpenAI 的 base URL 和模型名称。这太完美了。TensorZero 暴露了一个与 OpenAI 兼容的推理端点,所以我们可以轻松地配置 Cursor,让它调用 TensorZero 而不是 OpenAI。
In the TensorZero configuration, we define a TensorZero function cursorzero so that we can automatically experiment with different models and prompts while storing provider-agnostic inference and feedback data in our database for observability and optimization.
在 TensorZero 的配置中,我们定义了一个名为 cursorzero 的 TensorZero 函数。这样,我们就能自动地用不同的模型和提示词进行实验,同时将与提供商无关的推理和反馈数据存储在我们的数据库中,用于可观察性和优化。
第一个障碍:Cursor 的服务器
Cursor was initially unable to connect to TensorZero running locally.
It turns out that Cursor first sends a request to its own servers, where additional processing happens before making the LLM call, so it couldn’t connect to our gateway on localhost.
(This also means that your credentials must be forwarded to Cursor’s servers, allowing them to collect data on your inferences and codebase.)
起初,Cursor 无法连接到本地运行的 TensorZero。结果发现,Cursor 会先把请求发送到它自己的服务器,在进行一些额外处理之后,才去调用 LLM。因此,它无法连接到我们在 localhost 上的网关。(这也意味着,你的凭证必须被转发到 Cursor 的服务器,这让他们可以收集关于你的推理和代码库的数据。)
As a test that our plan could work in the first place, we pointed Cursor to OpenRouter and realized we could use its models for the Ask, Agent, and Cmd+K interactions in Cursor.
We were also still able to use the normal Cursor Tab completions, which rely on a proprietary model Cursor serves for inline completions (it is very good, so we’re glad to be able to keep it).
为了首先验证我们的计划是否可行,我们把 Cursor 指向了 OpenRouter,并发现我们可以使用它的模型来处理 Cursor 中的“询问”、“代理”和“Cmd+K”交互。同时,我们仍然能使用常规的 Cursor Tab 补全,这个功能依赖于 Cursor 提供的一个专有模型(这个模型非常好,我们很高兴能保留它)。
The solution was to set up a reverse proxy to expose a public endpoint that would forward requests back to our machine.
We used Ngrok to keep things simple.
Since we were exposing a gateway with LLM credentials to the public Internet, we added Nginx in front of our gateway to authenticate requests.
We set Cursor’s base URL to our Ngrok endpoint, added the credentials we set up in Nginx, turned off built-in models, and finally added our new TensorZero function under the model name tensorzero::function_name::cursorzero.
解决方案是设置一个反向代理,暴露一个公共端点,将请求转发回我们的机器。为了简单起见,我们用了 Ngrok。由于我们将一个带有 LLM 凭证的网关暴露到了公共互联网上,我们在网关前加了 Nginx 来验证请求。我们将 Cursor 的 base URL 设置为我们的 Ngrok 端点,添加了我们在 Nginx 中设置的凭证,关闭了内置模型,最后在模型名称下添加了我们新的 TensorZero 函数 tensorzero::function_name::cursorzero。
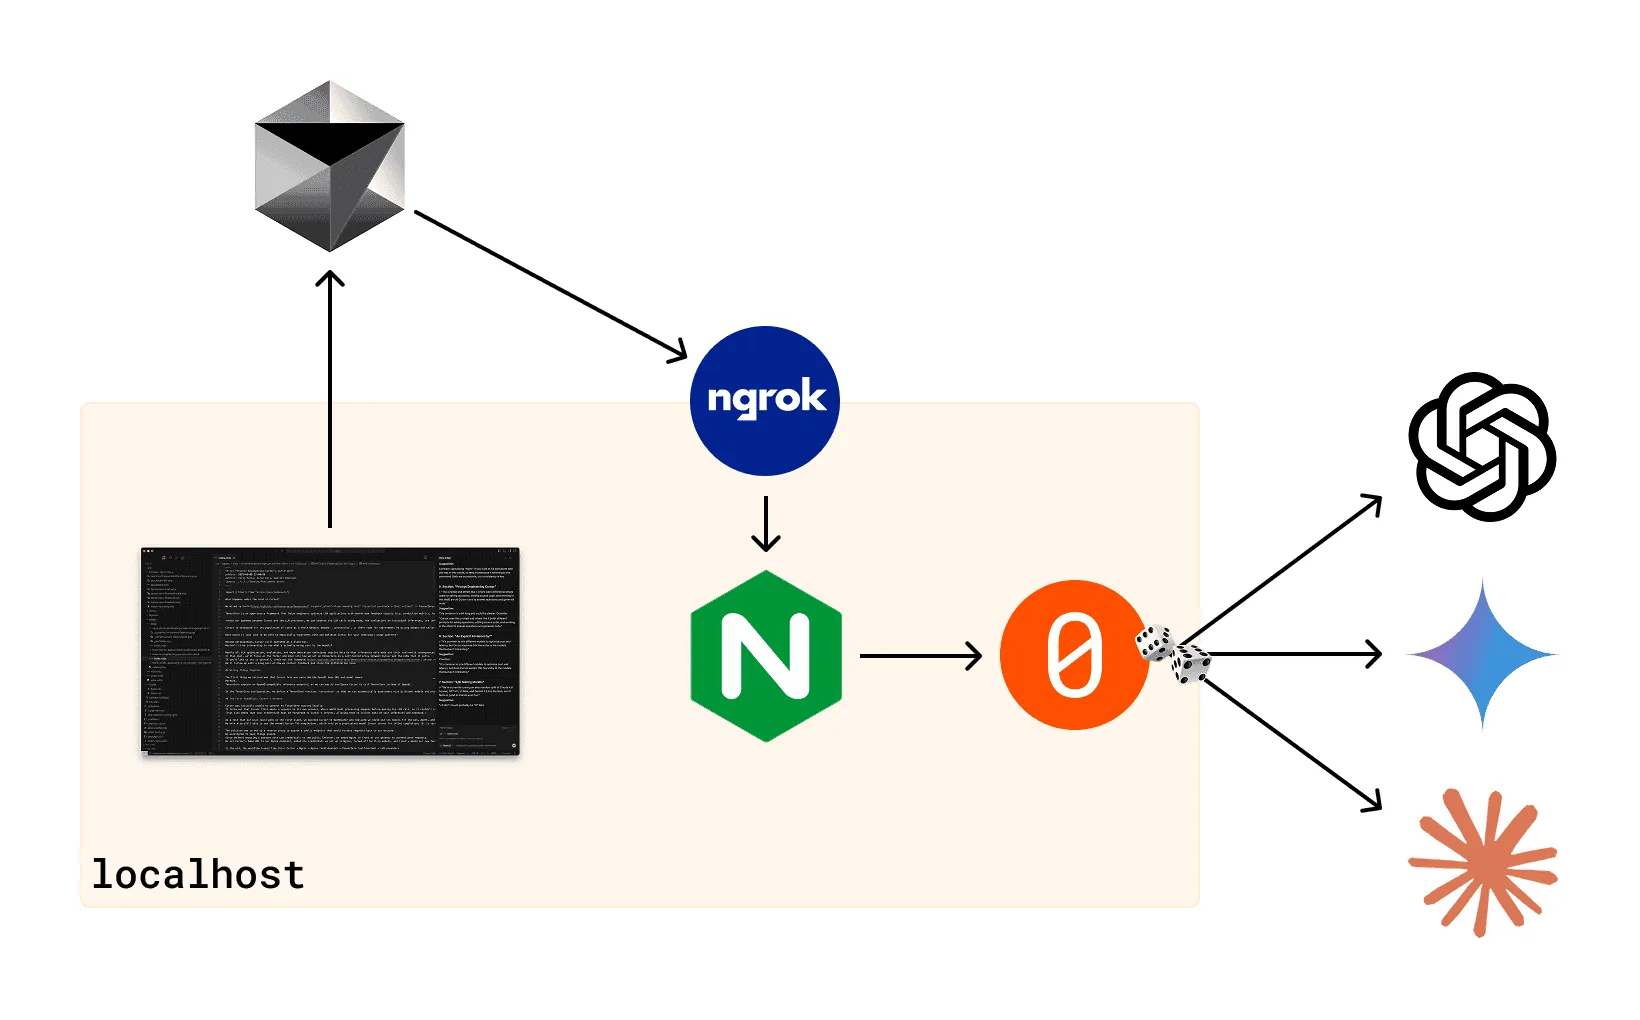
In the end, the workflow looked like this: Cursor → Ngrok → Nginx (self-hosted) → TensorZero (self-hosted) → LLM providers
最终,工作流看起来是这样的:Cursor → Ngrok → Nginx (自托管) → TensorZero (自托管) → LLM 提供商
But it didn’t work.
但它没用。
第二个障碍:CORS
The authentication process had failed.
认证过程失败了。
Nginx logs showed that there was an OPTIONS request hitting our endpoint, so we configured Nginx to return headers on OPTIONS requests and incrementally added headers we saw in responses from the OpenAI API.
This is the initial verification request that comes from the local Cursor IDE.
The CORS requirement likely comes from Electron.
Nginx 日志显示,有一个 OPTIONS 请求打到了我们的端点。于是我们配置 Nginx,让它在收到 OPTIONS 请求时返回正确的头信息,并逐步添加了我们从 OpenAI API 响应中看到的那些头信息。这是来自本地 Cursor IDE 的初始验证请求。这个 CORS 要求很可能源于 Electron。
After the initial verification, all requests come from Cursor’s servers.
在初始验证之后,所有的请求都来自 Cursor 的服务器了。
Our Nginx Configuration to handle CORS headers
# --- CORS helper macro ---
set $CORS_ALLOW_ORIGIN  $http_origin;   # reflect the caller's origin
set $CORS_ALLOW_HEADERS "Authorization,Content-Type";

location / {
  # --- pre-flight ---
  if ($request_method = OPTIONS) {
      add_header Access-Control-Allow-Origin      $CORS_ALLOW_ORIGIN always;
      add_header Access-Control-Allow-Credentials "true"             always;
      add_header Access-Control-Allow-Methods     "GET,POST,OPTIONS" always;
      add_header Access-Control-Allow-Headers     $CORS_ALLOW_HEADERS always;
      add_header Access-Control-Max-Age           86400              always;
      return 204;  # 204 (No Content) is conventional for pre-flight
  }
}
我们用于处理 CORS 头的 Nginx 配置
# --- CORS 辅助宏 ---
set $CORS_ALLOW_ORIGIN  $http_origin;   # 反射调用者的 origin
set $CORS_ALLOW_HEADERS "Authorization,Content-Type";

location / {
  # --- 预检请求 ---
  if ($request_method = OPTIONS) {
      add_header Access-Control-Allow-Origin      $CORS_ALLOW_ORIGIN always;
      add_header Access-Control-Allow-Credentials "true"             always;
      add_header Access-Control-Allow-Methods     "GET,POST,OPTIONS" always;
      add_header Access-Control-Allow-Headers     $CORS_ALLOW_HEADERS always;
      add_header Access-Control-Max-Age           86400              always;
      return 204;  # 204 (No Content) 是预检请求的常规做法
  }
}
You can find the entire codebase for “CursorZero” on GitHub.
你可以在 GitHub 上找到 “CursorZero” 的完整代码库。
It finally worked!
它终于成功了!
最终:Cursor 的可观察性
We could finally see everything coming in and out of Cursor — including its prompts.
我们终于能看到进出 Cursor 的所有东西了——包括它的提示词。
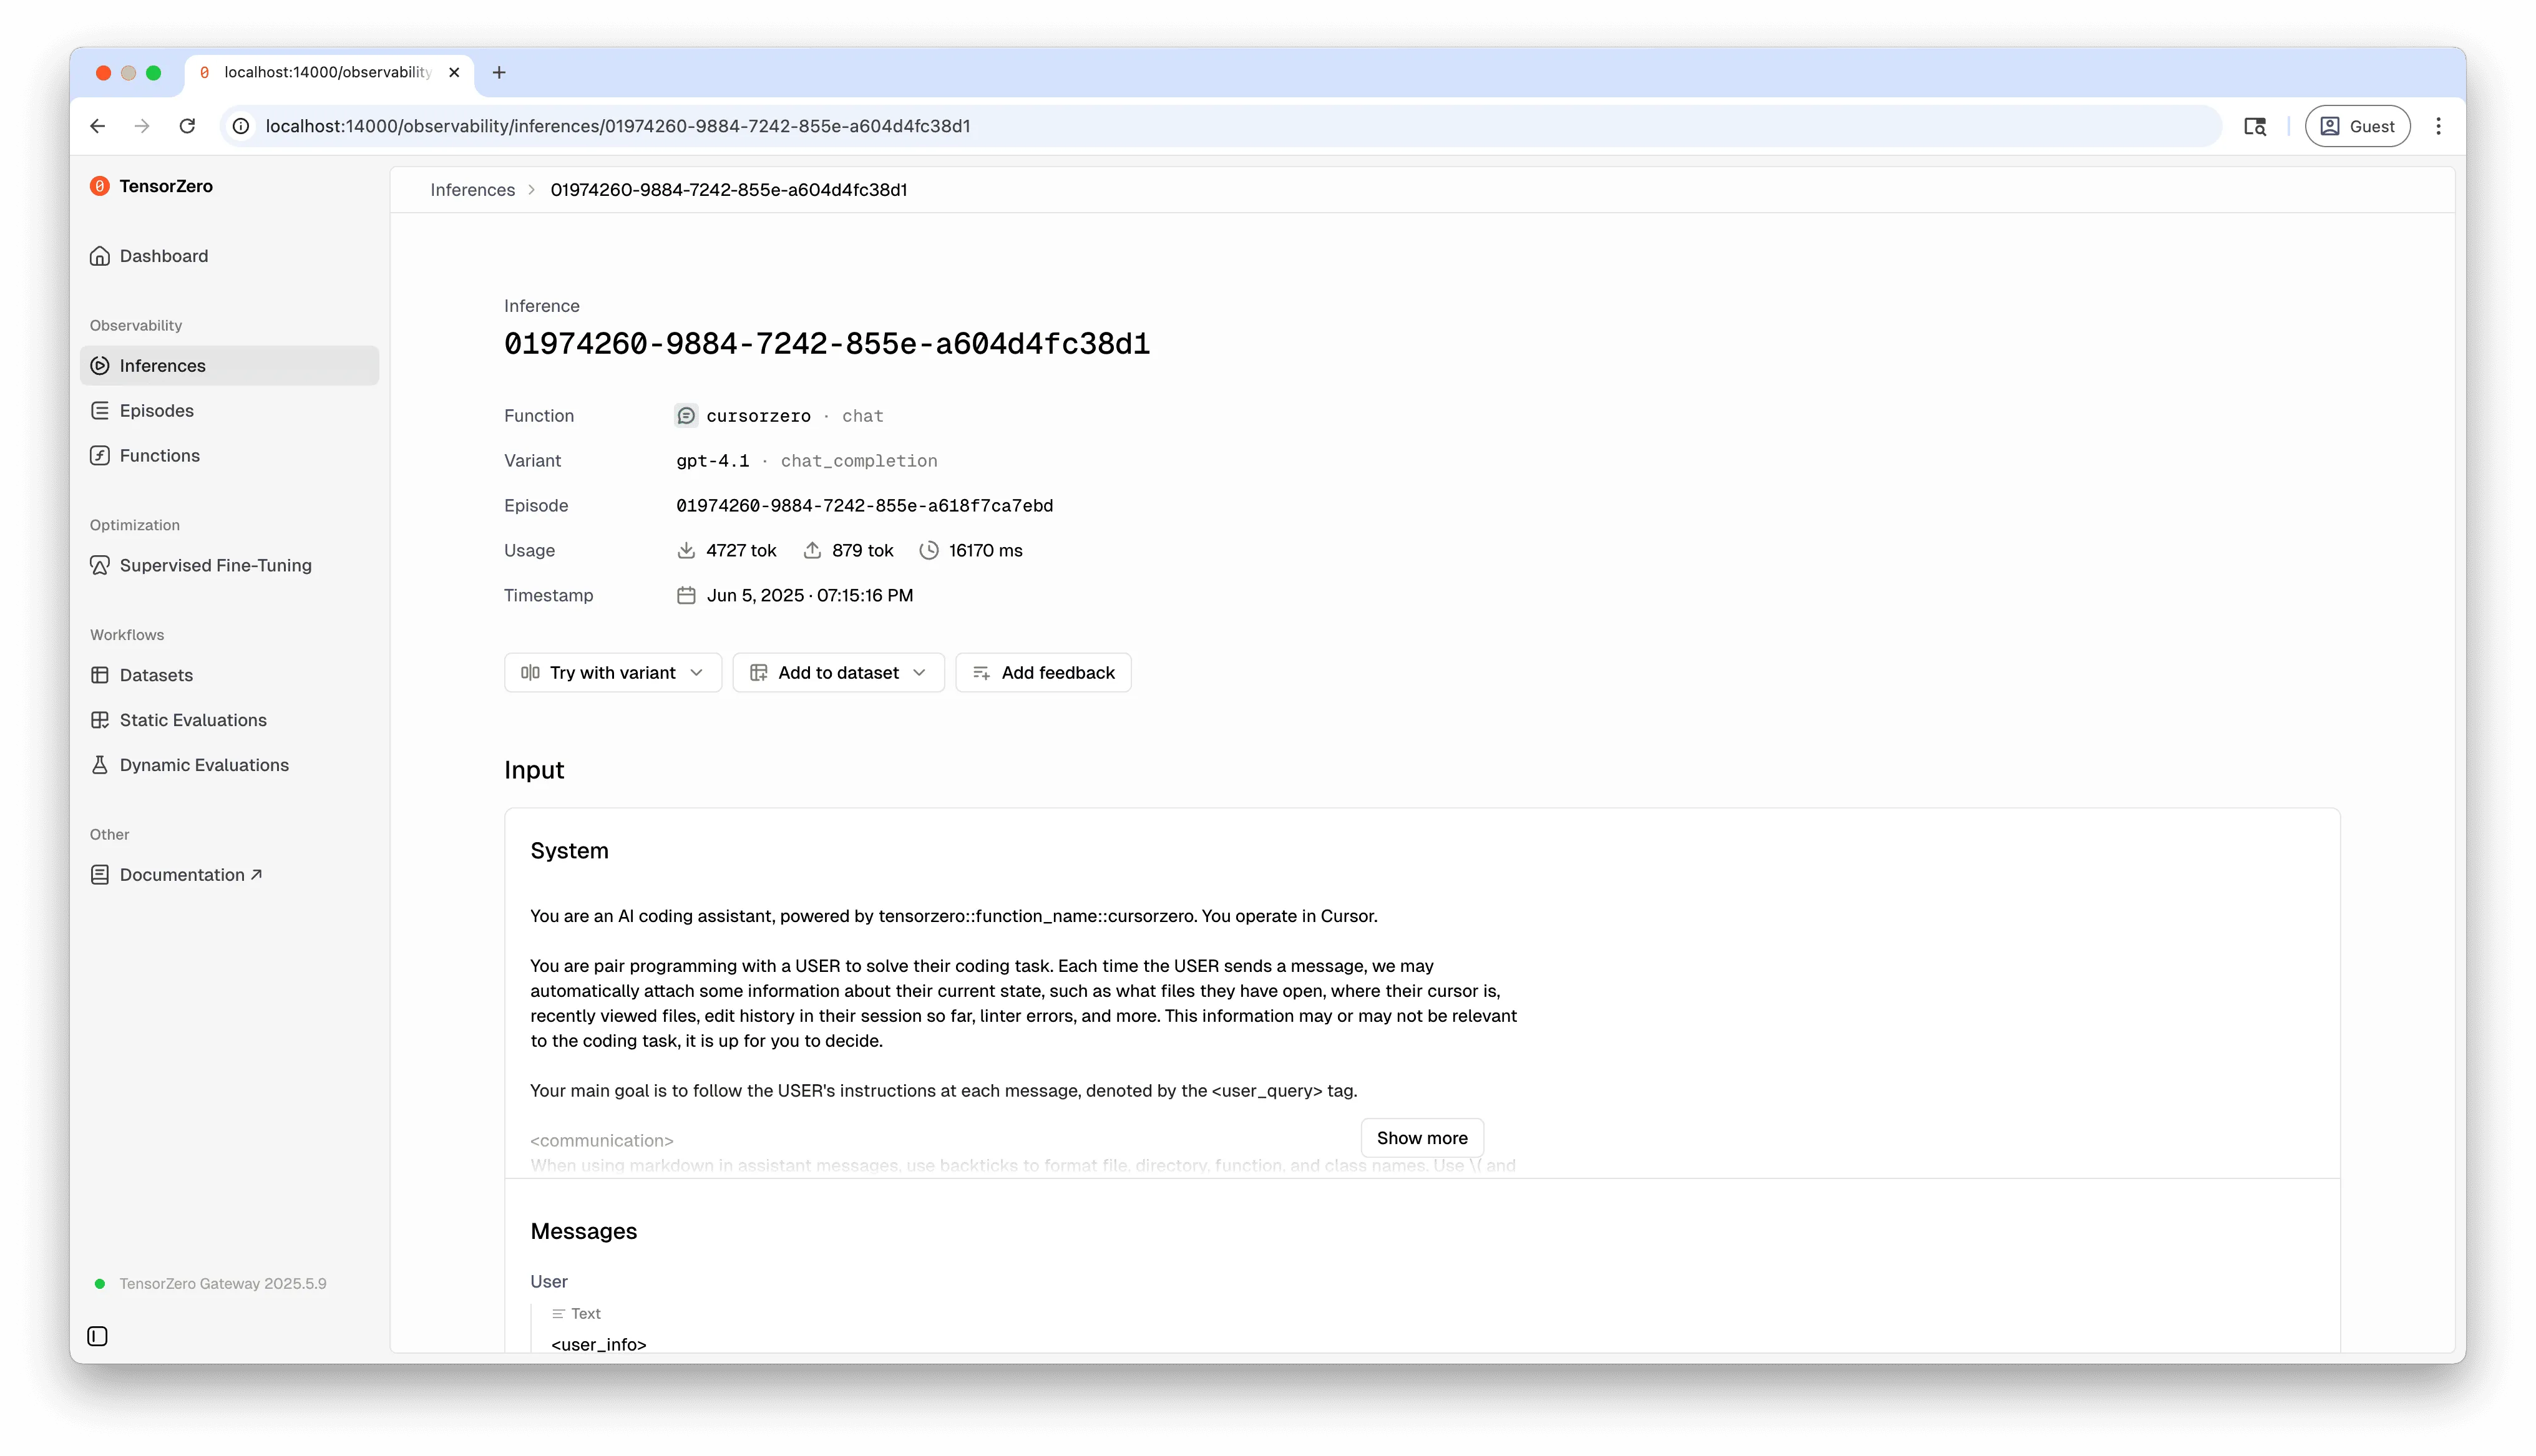
For example, here’s what we saw after asking Cursor “how do I get nginx to get the key from an environment variable in my .env?”
例如,当我们问 Cursor “我如何让 nginx 从我的 .env 文件中的环境变量里获取密钥?”时,我们看到了以下内容。
系统提示词
You are a an AI coding assistant, powered by tensorzero::function_name::cursorzero. You operate in Cursor

You are pair programming with a USER to solve their coding task. Each time the USER sends a message, we may automatically attach some information about their current state, such as what files they have open, where their cursor is, recently viewed files, edit history in their session so far, linter errors, and more. This information may or may not be relevant to the coding task, it is up for you to decide.

Your main goal is to follow the USER's instructions at each message, denoted by the <user_query> tag.

<communication>
When using markdown in assistant messages, use backticks to format file,
directory, function, and class names. Use ( and ) for inline math, [ and ]
for block math.
</communication>

<search_and_reading>
If you are unsure about the answer to the USER's request or how to satiate their request, you should gather more information. This can be done by asking the USER for more information.

Bias towards not asking the user for help if you can find the answer yourself.
</search_and_reading>

<making_code_changes>
The user is likely just asking questions and not looking for edits. Only suggest edits if you are certain that the user is looking for edits.
When the user is asking for edits to their code, please output a simplified version of the code block that highlights the changes necessary and adds comments to indicate where unchanged code has been skipped. For example:

\`\`\`language:path/to/file
// ... existing code ...
{{ edit_1 }}
// ... existing code ...
{{ edit_2 }}
// ... existing code ...
\`\`\`

The user can see the entire file, so they prefer to only read the updates to the code. Often this will mean that the start/end of the file will be skipped, but that's okay! Rewrite the entire file only if specifically requested. Always provide a brief explanation of the updates, unless the user specifically requests only the code.

These edit codeblocks are also read by a less intelligent language model, colloquially called the apply model, to update the file. To help specify the edit to the apply model, you will be very careful when generating the codeblock to not introduce ambiguity. You will specify all unchanged regions (code and comments) of the file with "// … existing code …" comment markers. This will ensure the apply model will not delete existing unchanged code or comments when editing the file. You will not mention the apply model.
</making_code_changes>

<user_info>
The user's OS version is darwin 24.3.0. The absolute path of the user's workspace is /Users/viraj/tensorzero/tensorzero/examples/cursorzero. The user's shell is /bin/zsh.
</user_info>

You MUST use the following format when citing code regions or blocks:

\`\`\`12:15:app/components/Todo.tsx
// ... existing code ...
\`\`\`

This is the ONLY acceptable format for code citations. The format is \`\`\`startLine:endLine:filepath\`\`\` where startLine and endLine are line numbers.
用户提示词
<additional_data>
Below are some potentially helpful/relevant pieces of information for figuring out to respond

<current_file>
Path: nginx/nginx.conf
Line: 1
Line Content: `events {}`
</current_file>
<attached_files>
<file_contents>

\`\`\`path=nginx/nginx.conf, lines=1-46
events {}

http {
  log_format main '$remote_addr - $remote_user [$time_local] "$request" '
                  '$status $body_bytes_sent "$http_referer" '
                  '"$http_user_agent"';
  access_log /var/log/nginx/access.log main;

  map $http_authorization $is_authorized {
      default                                 0;
      "~*^Bearer your-token-here$"             1;
  }

  server {
      listen 80;

      # --- CORS helper macro ---
      set $CORS_ALLOW_ORIGIN  "$http_origin";   # reflect the caller's origin
      set $CORS_ALLOW_HEADERS "Authorization,Content-Type";

      location / {
          # --- pre-flight ---
          if ($request_method = OPTIONS) {
              add_header Access-Control-Allow-Origin  "$CORS_ALLOW_ORIGIN" always;
              add_header Access-Control-Allow-Credentials "true"          always;
              add_header Access-Control-Allow-Methods "GET,POST,OPTIONS"   always;
              add_header Access-Control-Allow-Headers "$CORS_ALLOW_HEADERS" always;
              add_header Access-Control-Max-Age       86400               always;
              return 204;          # 204 No Content is conventional for pre‑flight
          }

          # --- authenticated requests ---
          if ($is_authorized = 0) {
              return 401;
          }

          proxy_pass         http://gateway:3000;
          proxy_set_header   Host $host;

          # expose CORS headers on the real response too
          add_header Access-Control-Allow-Origin      "$CORS_ALLOW_ORIGIN" always;
          add_header Access-Control-Allow-Credentials "true"               always;
      }
  }
}

\`\`\`

</file_contents>

<manually_added_selection>

\`\`\`path=nginx/nginx.conf, lines=1-16
events {}

http {
  log_format main '$remote_addr - $remote_user [$time_local] "$request" '
                  '$status $body_bytes_sent "$http_referer" '
                  '"$http_user_agent"';
  access_log /var/log/nginx/access.log main;

  map $http_authorization $is_authorized {
      default                                 0;
      "~*^Bearer your-token-here$"             1;
  }

  server {
      listen 80;

\`\`\`

</manually_added_selection>

</attached_files>
</additional_data>

<user_query>
how do I get nginx to get the key from an environment variable in my .env?
</user_query>
Response
响应
I see you're trying to use an environment variable for your authentication token in the Nginx configuration instead of hardcoding "your-token-here" in the `nginx.conf` file.

Unfortunately, Nginx doesn't directly read environment variables from a `.env` file. However, there are a few approaches you can take:

### Option 1: Use Nginx's environment variable support with a template

1. Create a template file (e.g., `nginx.conf.template`) with a placeholder:

\`\`\`

map $http_authorization $is_authorized {
  default 0;
  "~*^Bearer ${API_TOKEN}$" 1;
}

\`\`\`

2. Then use a script to replace the placeholder with the actual environment variable before starting Nginx:

\`\`\`bash
#!/bin/bash
# Load environment variables from .env
source .env
# Replace placeholder with actual token
envsubst '${API_TOKEN}$' < /path/to/nginx.conf.template > /path/to/nginx.conf
# Start Nginx
nginx -g 'daemon off;'
\`\`\`

### Option 2: Use Docker environment variables (if using Docker)

If you're running Nginx in Docker, you can pass environment variables to the container and use `envsubst`:

\`\`\`dockerfile
FROM nginx:alpine
COPY nginx.conf.template /etc/nginx/templates/default.conf.template
CMD ["/bin/sh", "-c", "envsubst '${API_TOKEN}$' < /etc/nginx/templates/default.conf.template > /etc/nginx/conf.d/default.conf && nginx -g 'daemon off;'"]
\`\`\`

Then run with:

\`\`\`bash
docker run -e API_TOKEN=your-secret-token -p 80:80 your-nginx-image
\`\`\`

### Option 3: Use a separate authentication service

Instead of hardcoding the token in Nginx, you could proxy authentication requests to a separate service that has access to environment variables:

\`\`\`
location /auth {
  proxy_pass http://auth-service:3001;
  # This service can read environment variables
}
\`\`\`

For your specific case, I'd recommend Option 1 or 2 depending on your deployment setup. This way, you can keep your token in your `.env` file and have it securely injected into the Nginx configuration at startup time.
对 Cursor 进行提示词工程
This example paints a picture of what prompt engineering looks like for a state-of-the-art AI coding assistant.
这个例子让我们看到了一个顶尖的 AI 编程助手的提示词工程是什么样的。
This prompt and others like it (there were different prompts used for asking questions, editing source code, and working in the shell) are all Cursor uses to answer questions and generate code.
We find it remarkable that there isn’t more here and that all of software engineering has been internalized enough by the current generation of LLMs that you can get the brains behind Cursor with a 642-token system prompt.
This must be due to extensive post-training efforts by the big labs.
这个提示词以及其他类似的提示词(对于提问、编辑源代码和在 shell 中工作,都有不同的提示词)就是 Cursor 用来回答问题和生成代码的全部。我们觉得很了不起的是,这里面的东西并不多,而当前这一代 LLM 已经将整个软件工程内化到了如此程度,以至于你用一个 642-token 的系统提示词就能得到 Cursor 背后的大脑。这一定得归功于那些大实验室在模型训练后所做的大量工作。
一个明确的 AI 等级体系?
We find the following snippet particularly intriguing:
我们觉得下面这段话特别有意思:
These edit codeblocks are also read by a less intelligent language model, colloquially called the apply model, to update the file. To help specify the edit to the apply model, you will […]. You will not mention the apply model.
这些编辑代码块也会被一个不那么聪明的语言模型(俗称应用模型)读取,用来更新文件。为了帮助向应用模型指明编辑内容,你将[…]。你不要提及应用模型。
It’s common to mix different models to optimize cost and latency, but Cursor explains this hierarchy to the models themselves? Interesting.
混合使用不同的模型来优化成本和延迟是很常见的,但 Cursor 竟然向模型本身解释了这个等级体系?有意思。
A/B 测试模型
With TensorZero in place, we have the full Cursor experience with control over observability and experimentation of our LLM requests.
We’ve been running CursorZero for days of heavy software engineering: it’s been stable and there has been no noticeable additional latency.
有了 TensorZero,我们既能拥有完整的 Cursor 体验,又能控制我们 LLM 请求的可观察性和实验。我们已经高强度地用 CursorZero 进行了好几天的软件工程开发:它一直很稳定,而且没有察觉到任何额外的延迟。
We’re currently running an even random split of Claude 4.0 Sonnet, GPT-4.1, o4 Mini, and Gemini 2.5 Pro — and it feels as good as Cursor ever has.
我们目前正在随机均等地运行 Claude 4.0 Sonnet、GPT-4.1、o4 Mini 和 Gemini 2.5 Pro——感觉和用原版 Cursor 一样好。
自己试试
Interested in analyzing your own usage of AI coding assistants?
You can find instructions on GitHub to reproduce this work with Cursor and OpenAI Codex.
有兴趣分析你自己使用 AI 编程助手的情况吗?你可以在 GitHub 上找到用 Cursor 和 OpenAI Codex 复现这项工作的说明。
TensorZero helps you understand — and optimize — your LLM agents, even if you didn’t build them yourself!
TensorZero 帮助你理解——并优化——你的 LLM 代理,即使它们不是你亲手构建的!
但是等等…还有更多!
This blog post demonstrates how we successfully reverse-engineered Cursor’s LLM client by setting up TensorZero as a self-hosted proxy service, enabling us to observe, analyze, and experiment with different LLM models while maintaining the full Cursor experience.
这篇博客文章展示了我们如何通过将 TensorZero 设置为一个自托管的代理服务,成功地逆向工程了 Cursor 的 LLM 客户端,使我们能够在保持完整 Cursor 体验的同时,观察、分析和实验不同的 LLM 模型。
In our next post of this series, we’ll explain how we’re evaluating real-world usage of AI coding assistants, along with the results of our internal A/B testing between models.
Sneak peek: git hooks, tree-sitter, and more.
在本系列的下一篇文章中,我们将解释我们如何评估 AI 编程助手的实际使用情况,以及我们内部模型间 A/B 测试的结果。先睹为快:git hooks、tree-sitter 等等。
Then, we’ll explore if this feedback signal might be able to improve Cursor by optimizing models and inferences through your individual usage patterns.
然后,我们将探讨这种反馈信号是否有可能通过你个人的使用模式来优化模型和推理,从而改进 Cursor。